|

There are plenty of programmers around that let you enter a fixed set of parameters into the programmer software so that it may be able to program newer chips as they become available, but this approach is not very flexible.
The Engine offers a new approach, in that it that allows you to design your own programmer algorithms which are then attached to on screen buttons. When you click on one of these buttons, the processor on the main PCB executes the ascociated algorithm. You can use The Engine to program just about any type of chip. EPROMs, serial EEPROMs, microcontrollers from various manufacturers, time keeper chips, PROMs etc. You can even use it to do basic programmable electronic tasks if you find the need.
The best part is...
It's Free!!
Chip manufacturers sometimes decide to upgrade their programming
methods to make them work better, or add new algorithms for new
chips. This usually means that you need to upgrade the firmware
for your current programmer, which costs money. You do not need
to do this with The Engine because it is a simple task to upgrade
the programming software yourself. This could lead to the elimination
of firmware upgrades in the future.
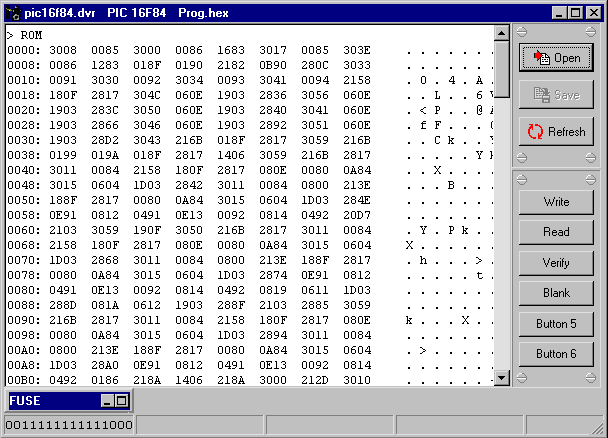
After checking the data sheets for the device, you then design the algorithm that will read the ROM contents from the chip like the code example shown here. This will read the ROM contents of the PIC16F84 and display it on the PC screen.
| Define(SetPC2(Hi) = ClockHi) | ; Define user instructions |
| Define(SetPC2(Lo) = ClockLo) | |
| BlockStart(Read16F84) | |
PreMessage(Reading ROM) |
; Define block messages |
Post Message(Reading ROM Completed) |
|
ErrorMessage(Cannot Read ROM) |
|
FailedMessage(Failed Reading) |
|
DataA |
; Filling Data A Block in PC |
SetVccP(On) |
; Power up target chip |
Wait(2000) |
; Stabilize delay |
SetVPP(On) |
; Programming Voltage on |
Wait(1000) |
; Stabilize delay |
ResetBuffer |
; Initialize buffer pointer |
DoForCount(128) |
; 128 X 8 = 1024 data words |
Call(Read) |
; Read 8 words of data |
SendTheBuffer |
; Transfer PIC buffer to PC |
EndDoForCount |
|
Exit |
; Done |
| Subroutine(Read) | ; Start of Read subroutine |
DoForCount(8) |
; Read 8 words from PIC |
Call(Command, 4) |
; 4 = read data command |
SetTrisC(****1***) |
; data line = input |
DoForCount(16) |
; clock in 16 bits |
ClockHi |
; clock = Hi |
ClockLo |
; clock = Lo |
ReadPC2(shrGPW1) |
; shift data bit to GP Word 1 |
EndDoForCount |
|
SetTrisC(****0***) |
; data line = output |
ShiftRight(GPW1) |
; delete start bit |
AndGPW1(3FFF) |
; mask upper 2 bits |
Buffer+<<GPW1 |
; put data into buffer |
Call(Command, 6) |
; 6 = inc address command |
EndDoForCount |
|
| Return | ; subroutine end |
| Subroutine(Command) | |
DoForCount(6) |
; 6 bits to send to PIC |
ClockHi |
; Clock = Hi |
SetPC3(shrCallP) |
; shift out call data |
ClockLo |
; clock it in to PIC |
EndDoForCount |
|
| Return | |
| BlockEnd | ; End of read routine block |
At this stage you can compile the file and check for errors. If there are none, you can upload it to The Engine with a simple mouse click. This takes less than a second.
With another mouse click you tell the processor to Execute the current file. If you have written your code correctly, the Message Screen on the PC will display the entire ROM contents of the PICmicro®MCU.
If your code did not work as expected, it's a simple matter to re-edit the source file which is still visible. Then recompile, upload and execute again with just a few mouse clicks. It only takes seconds.
You may have noticed that the above code is nested in BlockStart and BlockEnd statements. This is the function that will be executed after you have assigned it to a User Button. However, you may wish to do more than execute one function for a particular button, so you can concatenate up to 10 blocks of code. These will execute one after the other. An example of this would be expanding the above function to read the contents of the PIC16F84 internal EEPROM and FUSE.
The reason for the code blocks, is because the processor only has a limited amount of RAM in which to store your code. Therefore, it cannot execute a large program. With this software you do not need to write large programs so there is no problem. Another benefit here, is that The Engine's processor chip will not 'wear out' when new code is written to it on a continual basis. This could be a problem with a flash based processors as they usually have a limited amount of erase/re-write cycles.
You can write functions for up to 6 User Buttons which are available on screen.

The software also needs to know things like memory size and bit size for the chip it will program, so there are screens available to set these and other parameters.
You can define up to 4 special locations that may need your interaction when programming. With a special register, you can define it's address, name each bit of data, group bits together and set default states etc. An example of this could be the Fuse register used in the PICmicro®MCU.
The Engine's processor is a PIC16C74 or PIC16F874. All of the port pins, with the exception of 5, are freely available and can be individually programmed for your user functions.
There are 3 seperate power supplies on the PCB. Two of these are variable and the other is fixed at 5V which is used for the processor supply. The two variable supplies are used for the target chip's power and the programming voltage. These two supplies are configurable by the user, but there is no programming involved. The main reason is to keep it simple. The output voltages can be anywhere from about 2 Volts to 30 Volts. These two supplies are controlled by the processor and can be switched on and off under your control.
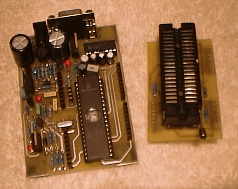
There is a huge variation in hardware requirements, so to try and cater for this in a simple fashion, you can connect small daughter boards to The Engine via a 40 way IDC cable. On these boards, you can include whatever circuitry you desire to program a device. The one in the picture above is a basic design for programming a large range of the PICmicro®MCU family, and some serial EEPROMs. As you are writing the programming software, you can choose which processor pins you need to program the target chip and design a simple PCB to suit. You can also use the generic PCB design that is included with the zipped file.
On these daughter boards, you need to connect some resistors to set the output voltages for the VccP and VPP programming voltages. This simple formula calculates the resistance required.
R = (96 X V) - 120.
Thus to get the 13V required for programming, the equation is:
R = (96 X 13) - 120
R = 1128 ohms.
I would use a single 1K1 resistor. If you want to be more precise, place a 27R resistor in series. You may even like to try a variable potentiometer to get a precise voltage. You are not limited to using this arrangement. You can design your own method of setting the programming voltages and use The Engine to control them. For example, you can create a circuit to generate upper and lower verify voltages and write code to control these via The Engine while programming a device..
Please Note:
The algorithms as presented use my own pin configuration from The Engine. If you make an adaptor board of your own design then you may need to change these pin definitions.
| PIC16C61 | PIC16C62 | PIC16C63 | PIC16C64 | PIC16C65 | PIC16C66 |
| PIC16C71 | PIC16C710 | PIC16C711 | PIC16C72 | PIC16C73 | PIC16C74 |
| PIC16F83 | PIC16F84 |
| 93C56 |
If you would like a zipped copy, click here. (614K) All the software for the PICmicro®MCU and Windows 95 as well as the PDF plans on how to build it are included along with a comprehensive help file. The PCB design is a little different than the one shown above. You will also need to obtain a serial cable as well as a 12VAC 1A power supply.
Now included, is a PCB design that allows you to connect any pin from The Engine processor to any pin on a 48 way ZIF socket. Plus it has a small prototyping area that allows you to create the circuits necessary for the VccP and VPP voltage control.
The Engine code can now be loaded into a PIC16F874 or PIC16F877 by using ROMzap.
This product remains the property of "Bubble Software" but is available free for public use. No part of it is to be sold, copied or distributed for any commercial purposes what so ever. No responsibillity will be taken by the author if damage arises due to the use of this product.