by Richard Cooke.
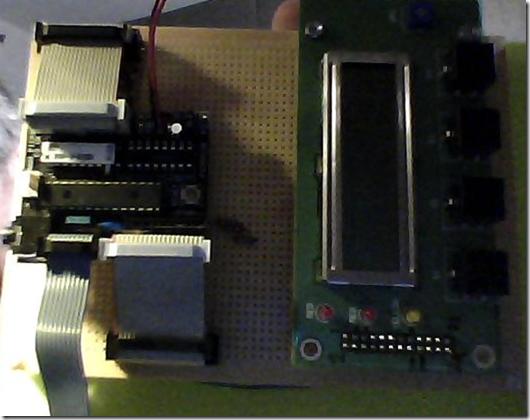
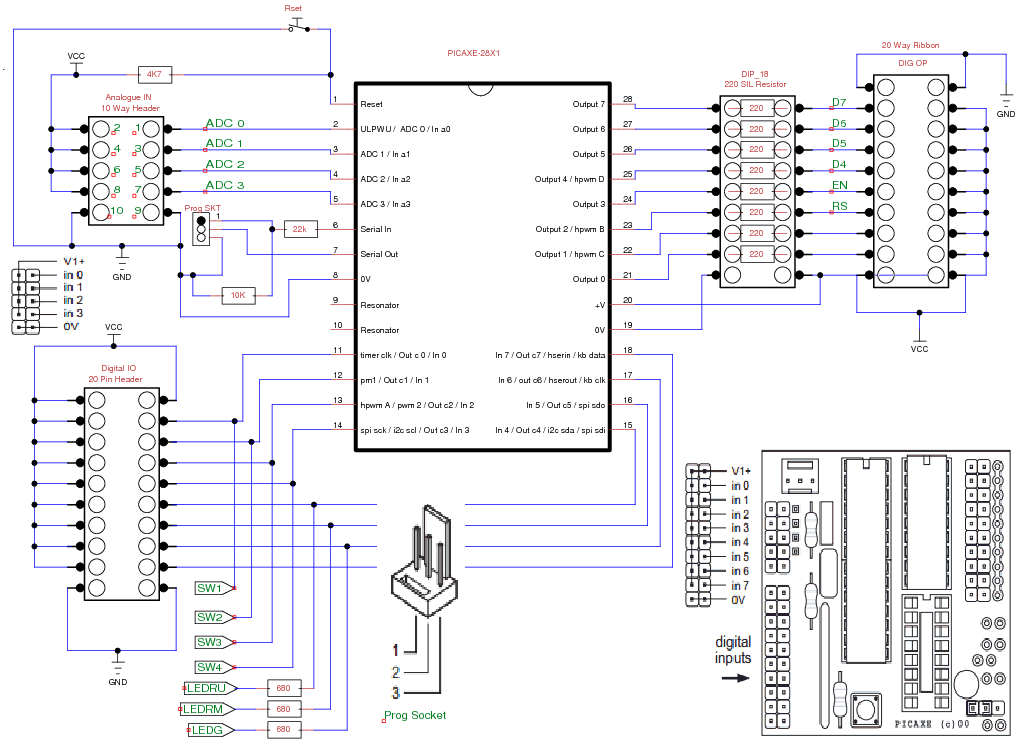
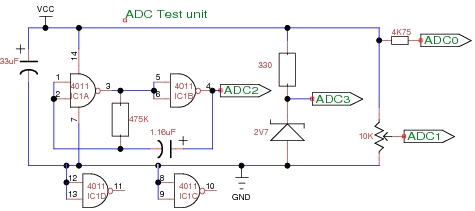
I have attached the circuit diagram of what I have done the bit in the bottom left is an ADC test module that plugs on the ADC port of the PICAXE board it provides a 1 Hz square wave, a 2.7 volt zener a variable DC and the VCC to the 4 ADC inputs. The original output of port B was using a darlington pack as you may see in the picture I replaced that with a DIL resistor pack just to get the connectivity to the LCD port
I have also attached the test software for the PICAXE (see below) that allows the 4 push buttons to turn on the LEDs (PB4 repeats PB1 to upper LED) and sends my name to the screen.
The Picaxe development system is available as a free down load from
http://www.picaxe.com/Software/PICAXE/PICAXE-Programming-Editor/
#PICAXE 28x1
setfreq m8

	EEPROM 0,("Richard Cooke V7") ' store the text in the EEPROM memory

	gosub init 	;initialise LCD
;Use one byte for dir storage this sets part of Port C as input and part as Output:
dirsc = %11110000 ' Set portc direction like this.  out, out, out, out, in, in, in, in.

symbol btn1 = pin0
symbol btn2 = pin1
symbol btn3 = pin2
symbol btn4 = pin3
symbol Mode = b27


low portc 7
low portc 6
low portc 5
low portc 4

Gosub LCD


Main:
Let b1 = 1
gosub wrins
b0=0
loop11:
lookup b0,("Select Mode"),b1
b0=b0+1
gosub wrchr
if b0<11 then loop11

b1=192		'Select line 2
gosub wrins
b0=0
loop14:
lookup b0,("AWP AWF VTE O2"),b1
b0=b0+1
gosub wrchr
if b0<14 then loop14
Pause 500

Main1:
gosub Key_scan
if mode = 1 then gosub AWP
if mode = 4 then gosub O2
Goto Main1

;Reads Buttons on the test module and lights LEDs
Key_scan:
If btn1 = 0 then high portc 4 endif
If btn1 = 0 then let mode = 1 endif
If btn1 = 1 then low portc 4 endif
If btn2 = 0 then high portc 5 endif
If btn2 = 0 then let mode = 2 endif
If btn2 = 1 then low portc 5 endif
If btn3 = 0 then high portc 6 endif
If btn3 = 0 then let mode = 3 endif
If btn3 = 1 then low portc 6 endif
If btn4 = 0 then high portc 4 endif
If btn4 = 0 then let mode = 4 endif
If btn4 = 1 then low portc 4 endif
Return

'************************************************************************************
' 			MEASURE Airway Oxygen Concentration
'************************************************************************************

O2:
Let b1 = 1
gosub wrins
b0=0
loop15:
lookup b0,("O2 Concentration"),b1
b0=b0+1
gosub wrchr
if b0<16 then loop15
Pause 50

Oxygen:
readadc 3,b0
w2=b0*100		'Scale ADC value to = 100% FSD default 100
w2=w2/50		'Scale ADC value to = 100% FSD default 100
w3=w2/100		'
w4=w2//100
w4=w4/10
w5=w2//10
w3=w3+48		'convert individual digits to ASCII
w4=w4+48
w5=w5+48

b1=192		'Select line 2
gosub wrins		'		'
b0=0
loop16:
lookup b0,("  ",b6,b8,".",b10,"%"),b1
b0=b0+1
gosub wrchr
if b0<7 then loop16
Gosub Key_scan
if mode = 2 then goto main
goto Oxygen

'************************************************************************************
' 			MEASURE Airway Pressure on ADC Channel 1
'************************************************************************************

AWP:
low portc 4
Let b1 = 1
gosub wrins
b0=0
loop12:
lookup b0,("Airway Pressure "),b1
b0=b0+1
gosub wrchr
if b0<15 then loop12
Pause 50

cmh2o:
readadc 1,b0
w2=b0*40		'Scale ADC value to = 100cmH2O FSD default 100
w2=w2/102		'Scale ADC value to = 100cmH2O FSD default 100
w3=w2/100		'
w4=w2//100
w4=w4/10
w5=w2//10
w3=w3+48		'convert individual digits to ASCII
w4=w4+48
w5=w5+48

b1=192		'Select line 2
gosub wrins		'
'Gosub Key_scan
'if mode = 1 then goto main			'
b0=0
loop13:
lookup b0,("cmH2O  ",b6,b8,b10,"  "),b1
b0=b0+1
gosub wrchr
if b0<12 then loop13
Gosub Key_scan
if mode = 2 then goto main
goto cmh2o
'************************************************************************************
' 			Opening Screen
'************************************************************************************

LCD:
	let b1 = 1 			' set b1 to ‘clear display’ instruction and "1" Sets Line 1 as the place to send text
	gosub wrins 		' send instruction to LCD
		 			' b1=192 would write to line 2 of a 16x 2 line display
	let b1 = 12 		' set b1 to ‘hide cursor’ instruction
	gosub wrins 		' send instruction to LCD

	For b0 = 0 to 15		' For...next loop - Read "RichardCooke + Version " text into LCD
	read b0, b1       	' read letter from EEPROM into variable b1
	gosub wrchr       	' send character to LCD
	Next b0			' Loop
	pause 6000			' pause for 0.4s


'************************************************************************************
' 			MEASURE BATTERY VOLTS
'************************************************************************************

			'28X1 28 b0-27 w0-13 describes how the words are broken down into digit from the words to send
			'first numbers then eventually text to the display

battery:
readadc 0,b0	'External resistors can be scaled to give a resulting
			'count of around 120 for a 12volt battery-16K from +12volt to
			'adc input 0 and 3K9 from adc input 3 to ground. In my Jig its direct to VCC but will not be true
w2=b0*18		'adjust the division in this line to correct adc count by multiplication and then division so that
w2=w2/100		'the display shows the correct voltage - change the division from 100 to  18 for 5V in this instance
w3=w2/100		'Derive individual digits for display
w4=w2//100
w4=w4/10
w5=w2//10
w3=w3+48		'convert individual digits to ASCII
w4=w4+48
w5=w5+48
b1=192		'display message "BATTERY = ***V"at start of display line 2
			'ASCII characters are formatted,punctuated,and labelled,
gosub wrins		'and fed to 16 character X 2 line alphanumeric display-
			'display starts at position 1- Display uses industry
			'standard Hitachi HD44780 chip. Display format can be
			'simply altered to accomodate 2X20,2X40,4X16 displays

b0=0
loop10:
lookup b0,("BATTERY=",b6,b8,".",b10,"V"),b1
b0=b0+1
gosub wrchr
if b0<13 then loop10
pause 6000		'display battery volts for 1.5 seconds

goto main
'************************************************************************************
'				HD44780 LCD DISPLAY ROUTINES
'************************************************************************************

	'#########################################################
	'# Initialisation subprocedure for the LCD               #                                                                        #
	'# Use Port B For LCD                                    #                                                                                       #
	'# B.7 - 14 (DB7)                                        #                                                                                              #
	'# B.6 - 13 (DB6)                                        #                                                                                              #
	'# B.5 - 12 (DB5)                                        #                                                                                              #
	'# B.4 - 11 (DB4)                                        #                                                                                              #
	'# B.2 - 4 (RS)                                          #                                                                                                 #
	'# B.3 - 6 (E)                                           #                                                                                                   #
	'#########################################################


init:				'INITIALISE DISPLAY subroutine
pins=0			'clear all output lines
b0=0				'reset variable b0
pause 800			'wait 200ms for lcd to reset
pins=48			'set to 8 bit operation
pulsout 3,4			'send data by pulsing enable line
pause 40			'wait 10ms
pulsout 3,4			'send data by pulsing enable line
pulsout 3,4			'send data by pulsing enable line
let pins=32			'set to 4 bit operation
pulsout 3,4			'send data by pulsing enable line
pulsout 3,4			'send data by pulsing enable line
let pins=128		'set to 2 line operation
pulsout 3,4			'send data by pulsing enable line
b1=14				'screen on, cursor on operation
gosub wrins			'write instruction to lcd
return			'return to main program


wrchr:			'WRITE CHARACTER subroutine
pins=b1&240			'mask high nibble of b1 into b2
high 2			'make sure RS is high(character mode)
pause 4
pulsout 3,4			'send data by pulsing enable line
b2=b1*16			'put low nibble of b1 into b2
pins=b2&240			'mask the high nibble of b2
high 2			'make sure RS is high
pause 4
pulsout 3,4			'send data by pulsing enable line
return			'return to main program


wrins:			'WRITE INSTRUCTION subroutine
pins=b1&240			'mask high nibble of b1 into b2
low 2				'make sure RS is low(instruction mode)
pause 4
pulsout 3,4			'send data by pulsing enable line
b2=b1*16			'put low nibble of b1 into b2
pins=b2&240			'mask the high nibble of b2
low 2				'make sure RS is low
pause 4
pulsout 3,4			'send data by pulsing enable line
high 2			'back to character mode
pause 4
return			'return to main program
| file: /Techref/io/lcd/PICAXEADCtest_rc.htm, 9KB, , updated: 2013/2/13 10:07, local time: 2025/10/14 12:22,
216.73.216.53,10-2-207-162:LOG IN
|
| ©2025 These pages are served without commercial sponsorship. (No popup ads, etc...).Bandwidth abuse increases hosting cost forcing sponsorship or shutdown. This server aggressively defends against automated copying for any reason including offline viewing, duplication, etc... Please respect this requirement and DO NOT RIP THIS SITE. Questions? <A HREF="http://www.massmind.org/techref/io/lcd/PICAXEADCtest_rc.htm"> PICAXE ADC test using LCD Panel 1</A> |
| Did you find what you needed? |
Welcome to massmind.org! |
Welcome to www.massmind.org! |
.