![]() See the tutorial lesson on
links for a hands-on example.
See the tutorial lesson on
links for a hands-on example.
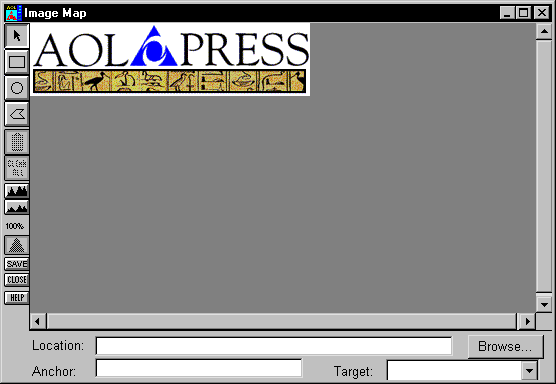
AOLpress makes it quick and easy to create both client and server side image maps for the same image. First you create the image and include it in your page. Then you define the areas of the image that are linked to other pages.
mypage.htm, http://www.aolpress.com/,
or mailto:-Remove-myaddress at -Remove-me.com. You can click the Browse
button to search for a page you want to link to. (You can also provide an
Anchor to link to a specific position
in a page and a Target Frame to contain the
page you link to.
The toolbar to the left of the Image Map dialog lets you create and manipulate the shapes of areas that will be links.
 |
Arrow: Use this tool to select an existing shape so that you can set a location, move, resize, delete, or change the stacking order of the shape. |
 |
Rectangle: Use this tool to create rectangular areas in your map. Then, type a location for that area. If you want to set a default location for all the parts of the image that don't have shapes, draw a rectangle around the entire image. Set the default location for this shape. Then, select the shape and use the "Ordering" tool to move this shape to the back. |
| Circle: Use this tool to create circular areas in your map. Hold down the mouse button on the image where you want the center to be and drag out the radius. Then, type a location for that area. | |
| Polygon: Use this tool to create multi-sided shapes in your map. Click out a series of points which define the polygon. End the polygon by clicking on your starting point, or by double clicking, or by selecting the arrow tool. Then, type a location for that area. | |
 |
Delete Shape: Click this button to delete the currently selected shape. |
 |
Delete All Shapes: Click this button to delete all the shapes in the map. (No Undo) |
 |
Magnify: Click this button to zoom in and make the image appear larger. |
 |
Reduce: Click this button to zoom out and make the image appear smaller. |
 |
Ordering: Select a shape, then click this tool to select from a menu that lets you Bring to front, Bring forward (one layer), Send backward (one layer), or Send to back. If two shapes overlap, the link for the shape in front is used. |

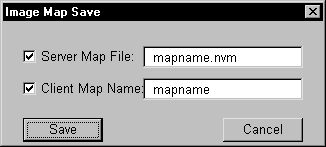 Save: Use this button to save your changes. You will see a dialog
that looks like the one to the right. By default, AOLpress creates both a
server-side map file for use on the AOLserver (with an extension of
Save: Use this button to save your changes. You will see a dialog
that looks like the one to the right. By default, AOLpress creates both a
server-side map file for use on the AOLserver (with an extension of
.nvm) and client-side map information, which it stores in your
page with the name you specify. You can uncheck one of the fields if you
don't want to create both types of map files.
 Close: Click
this button to close the Image Map dialog. You will be prompted to save any
changes you have made.
Close: Click
this button to close the Image Map dialog. You will be prompted to save any
changes you have made.
 Help: Click this button for online help
on making image maps.
Help: Click this button for online help
on making image maps.
You can see the .nvm file you create for server-side image maps
in the MiniWeb view. If you delete an image map from a page (by highlighting
it and pressing the Delete key), the actual image and image map files are
not deleted. To delete the files, you can use
File![]() Delete or select and delete the files' icons in the MiniWeb view.
Delete or select and delete the files' icons in the MiniWeb view.
If you did not get the shape quite right when you specified it, you may alter it later. If you select a shape (by clicking inside it with the arrow tool) you may drag it around to reposition it. You may also drag the handles to resize a shape. (You may resize the width and height proportionally by holding down the shift key and dragging a corner.) For polygons you may click on a point in the polygon and drag it around to reposition it.
You may delete a point from a polygon by selecting it (click on the point) and then pressing backspace or delete (or using the trash can tool). You may insert a point into a polygon by control-clicking on top of one of the lines of the polygon.
You may also adjust the shape with the arrow keys: Select the shape, handle or point which you wish to change and then press the arrow key. This changes the selected thing by one pixel in the obvious direction.
Selecting a shape and pressing backspace, delete or using the trash tool will delete that shape.
| file: /Techref/language/html/HELP/refer/mapmaker.htm, 9KB, , updated: 1997/3/23 18:30, local time: 2025/10/30 14:00,
216.73.216.50,10-8-63-169:LOG IN
|
| ©2025 These pages are served without commercial sponsorship. (No popup ads, etc...).Bandwidth abuse increases hosting cost forcing sponsorship or shutdown. This server aggressively defends against automated copying for any reason including offline viewing, duplication, etc... Please respect this requirement and DO NOT RIP THIS SITE. Questions? <A HREF="http://www.massmind.org/techref/language/html/HELP/refer/mapmaker.htm"> Building a picture map file</A> |
| Did you find what you needed? |
Welcome to massmind.org! |
Welcome to www.massmind.org! |
.