Adjustment
for the ultrasonic detection unit(1)
|
In case of mounting and removal of the ICs, always make a power OFF.  The ultrasonic sensor has a peculiar resonant frequency (about 40 KHz). The oscillation frequency of the transmitter must be adjusted to the resonant frequency. The adjustment procedure of the frequency is shown below.
Above, the adjustment of the transmission frequency is ending. Remove the short circuit line of the IC1 and mount the IC1.
The normally operation of the alarm signal can be confirmed by above-mentioned operation.  The photograph on the left is the one to have observed a voltage change in the case that the reflected wave of the ultrasonic is the outside of the detection range. Most the top is the one to have observed the reception wave of the ultrasonic and is the wave from of the 1st pin of IC4. A transmission wave and a reception wave are observed. The 2nd is the one to have observed the output of the time measurement gate circuit and is the wave form of the 10th pin of IC6. You can confirm that the gate works in the transmission timing and that the gate is closed by the reception signal. The 3rd is the one to have observed the output of the alarm detector and is the wave from of the 3rd pin of IC7. You can confirm that the timer has started from the transmission timing. The 4th is the one to have observed the output of the alarm detector and is the wave from of the 4th pin of IC6. Because it is receiving a reflected wave behind the time-out of the alarm detection timer, the output of the detector is as the H level. This condition is in the condition that the alarm doesn't come out. 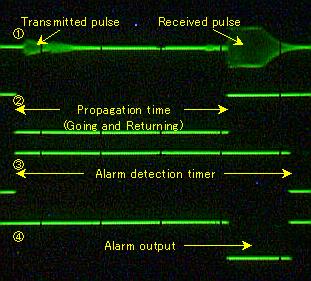 The photograph on the left is the one to have observed the voltage change of each part when the reflected wave of the ultrasonic is the inside of the detection range. The observation position of each signal is the same as above-mentioned photograph. As shown at the 3rd photograph, it is receiving a reflected wave before the time-out of the alarm detection timer. So, the output of the alarm detector becomes an L level until the alarm detection timer does in the time-out after receiving a reflected wave.(4th photograph) This L level signal becomes the trigger signal of the timer of the alarm output circuit and an alarm is output outside. |