This page is for the original "4 Axis" kit. It has been replaced with a
4th version.
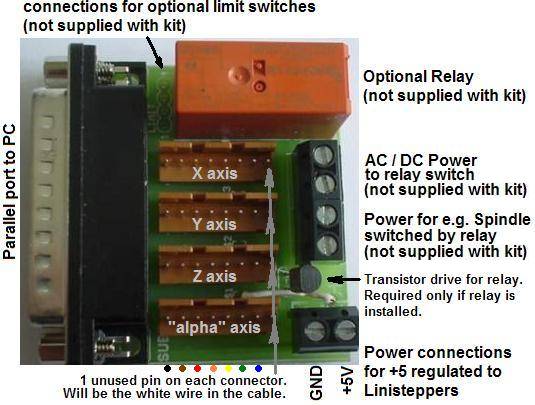
This kit (order here) allows up to 4 linisteppers to be easily connected to the parallel port of your pc. Space for a relay is included, so spindle or coolant can be turned on & off. The relay is NOT included in this kit. We accept NO responsibility for injury or damage resulting from use of this kit.
| Component list | |||||||||||||||||
|
|||||||||||||||||
Assembly
• The order of assembly isn’t very important. If you are going to install a relay, it is probably best to place the transistor last.
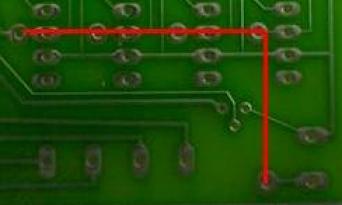 •
Skip this if you have the newer kit: If the pcb is single sided, one
"air wire" is needed to make a connection. It is best to use a stiff type
wire, like in a network cable, but if you don't have any other wire, you
can use the white wire from the supplied cables since that one is not needed.
Bend it in a 90 degree shape as shown by the red line in the picture here.
Then only remove the outer coating at the ends and bend the wire down into
the pads where soldering is needed.
•
Skip this if you have the newer kit: If the pcb is single sided, one
"air wire" is needed to make a connection. It is best to use a stiff type
wire, like in a network cable, but if you don't have any other wire, you
can use the white wire from the supplied cables since that one is not needed.
Bend it in a 90 degree shape as shown by the red line in the picture here.
Then only remove the outer coating at the ends and bend the wire down into
the pads where soldering is needed.
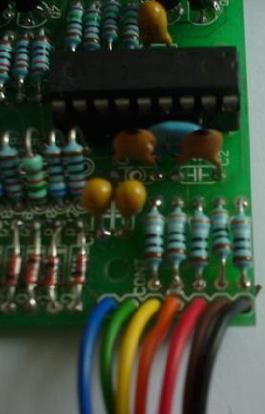
• The orientation of the wire click connectors is important! When looking at the circuit side. It can be seen that one of the 8 pins is left unused. Make sure the white cable corresponds to this pin.
Cable connection:
|
Looking at the image from left to right the cable orientation should be as follows: Black, brown, red, orange, yellow, green, blue, white. One cable the white cable remains unused. If you like, use that wire for the jumper on the PCB or to connect limit switches, etc...
Port connections:
| Axis | Step | Direction |
|---|---|---|
X |
2 | 3 |
Y |
4 | 5 |
Z |
6 | 7 |
| Alpha | 8 | 9 |
The port connections are in the standard order so that the board is compatible with almost all software. If you need to configure the port manually, use this table. The X Y Z and Alpha correspond to the connections in the picture starting with X at the top and moving to Alpha at the bottom of the picture. The numbers are the pins on the PC Port connector.
 Linistepper: The linistepper can be connected in two ways. The
supplied cable can be soldered to the linistepper. Which is best in terms
of connection. It is also possible to use the connectors supplied with the
linistepper to make it a cable type connection with the cable soldered to
the 4 axis board.
Linistepper: The linistepper can be connected in two ways. The
supplied cable can be soldered to the linistepper. Which is best in terms
of connection. It is also possible to use the connectors supplied with the
linistepper to make it a cable type connection with the cable soldered to
the 4 axis board.
Relay Option Space has been made on the board for a relay and a transistor to drive it. This could be connected to a power source and to a device to be control by the PC such as a spindle motor or coolent pump. Pin 1 of the parallel port is the pin, which needs to be configured for the device. Remember that working with electrical power is always dangerous!!! The kit provide NO optical isolation so it is quite possible to destroy your PC and injure or kill yourself or others.
Limit Switches The limit switches will need to be attached in a specific manner. They should be attached between the 5v output signal and one of the input pins (10-13). When the switch is then flipped it should then put the 5v signal on the input pins. Use the common 5v on all 4 limit switches. Care needs to be taken that a limited amount of current is put into the port. Using a 1k resistor will do the trick. The inputs are behind the relay on the board. They can also be used for other inputs like optical encoders.
Questions:
Electronically illiterate, but getting it together to build a small cnc in Brazil, I would like to know if there's some way of putting in optical encoders between the PC port and the linistepper control boards. How would I do this?
Comments:
| file: /Techref/io/stepper/linistep/4axisbuild.htm, 7KB, , updated: 2010/12/7 17:32, local time: 2025/9/24 01:22,
216.73.216.183,10-2-29-165:LOG IN
|
| ©2025 These pages are served without commercial sponsorship. (No popup ads, etc...).Bandwidth abuse increases hosting cost forcing sponsorship or shutdown. This server aggressively defends against automated copying for any reason including offline viewing, duplication, etc... Please respect this requirement and DO NOT RIP THIS SITE. Questions? <A HREF="http://www.massmind.org/techref/io/stepper/linistep/4axisbuild.htm"> 4 Axis kit for the linistepper</A> |
| Did you find what you needed? |
Welcome to massmind.org! |
Welcome to www.massmind.org! |
.